When you’re starting your first blog, it’s thrilling. You’re eager to launch it, but first, you need to set up your WordPress website. All of a sudden, the confusion sets in with the technical stuff: hosting, domains, themes and plugins. That’s why I write this mini guide to setting up WordPress for beginners.
If you’ve ever wondered how to set up WordPress or searched for a clear WordPress blog tutorial for beginners, you’re in the right place.
As a blog coach, I often work with beginner bloggers who find themselves overwhelmed with the idea of WordPress.
The thing is, once you learn how to set up WordPress, it all becomes clearer.
Take a deep breath – this post will help you with every step of setting up a WordPress blog:
- Choosing reliable hosting and a domain
- Installing and accessing WordPress
- Setting up your basic WordPress settings
- Installing a theme and essential plugins
- Common questions like “Why is my site not showing up yet?” or “How long does it take for DNS to update?”
Let’s get you ready with a WordPress site that’s ready for your first blog post.

DISCLOSURE: This post contains affiliate links, meaning if you click on a product or service, and decide to purchase it, I may receive a commission at no extra cost to you. All recommended products and services are based on my positive experience with them. For more information, please read my Disclaimer.
READY TO START A BLOG?
Learn step-by-step how to start a self-hosted WordPress blog, and make it profitable!
1. Choose the Right Hosting for Your WordPress Blog
Before you start your WordPress blog, you need to store your content somewhere.
While WordPress.com provides hosting for content, it’s not the same as a self-hosted WordPress website. A self-hosted WordPress blog means you are choosing your hosting provider, which will store the content.
Here’s the situation: you’ll find hundreds of hosting companies offering WordPress hosting. While some may be cheap, they may not provide the speed, security, simplicity and customer service you’ll need as a beginner blogger.
You’ll also need to be aware that those that are part of larger holding companies or part of networks are beholden to investor demands. They may not provide the quality you need. Independent hosting providers tend to have better services for what you pay.
Shared Hosting Plans
New bloggers will find that a shared hosting plan is the best choice as it’s affordable.
Hosting providers that I recommend for beginners include:
- NameHero
- Lyrical Host (best for UK-based)
- Siteground
- BigScoots
The last one is pricier from the start, but it doesn’t change pricing in the second year. It’s important to know that the others, aside from Big Scoots, will have special introductory pricing in the first year and then increase to regular pricing in the following years.
When you sign up for a hosting plan, most providers will prompt you to:
- Choose your domain name (or connect one you already own).
- Set up your WordPress website automatically.
- Access your hosting control panel (often called cPanel or Site Tools).
PRO Tip: Avoid hosts that don’t specialize in WordPress. It’s worth it to work with a hosting provider that offers WordPress support. Even better, work with hosting providers that are geared toward working with beginner bloggers. Lyrical Host is one of these, based out of the UK.
2. Connect or Register Your Domain
Your blog should have an address: your domain name.
You can get a domain through your hosting provider or a third-party site like Domain.com or Namehcheap.
Some hosting providers offer you the domain for free for the first year. After this, it’s an affordable annual cost moving forward.
If you’ve purchased your domain through your hosting provider, they’ll automatically get it set up on your site.
What about if you purchased it through Domain.com or another third party? You will need to connect your hosting account with your DNS (Domain Name System) records. Your hosting provider’s customer service should be able to help you with this process.
How DNS Works
Updating your nameservers – the part that points your domain to your hosting provider – can take time for the internet to recognize the change.
This is called DNS propagation and can take anywhere from a few minutes to 48 hours. In some cases, it can be faster. Be patient! You can’t hasten this process along.
At this point, your site won’t be showing up anywhere just yet. This is normal.
While you wait, finalize your blog’s structure, including its categories. Once your domain is connected, you’re ready for the fun part – setting up WordPress itself.
3. How To Set Up WordPress on Your Hosting Account & Access Tips
If you’re working with a beginner-friendly host like NameHero and purchase their WordPress hosting package, they will already have WordPress installed for you.
Now the fun part of setting up WordPress begins.
This is good news for beginner bloggers: you can now begin customizing your website. If not, you will have to set it up, and we have the instructions below.
WordPress Is Already Installed
After you log in to your hosting dashboard, look for something like:
- Access WordPress or
- Go to WordPress Admin or
- Log in to Dashboard
Clicking it takes you directly to your WordPress Dashboard.
If you don’t see WordPress installed yet, most hosts also include a one-click WordPress installer that does all the work for you in under five minutes (see below).
How to Log In to Your WordPress Dashboard
Once you’ve got WordPress installed, there are two ways you can access your dashboard:
The Hosting Dashboard
When you log into your hosting account, there should be a button for your WordPress dashboard. You don’t need to do another login process as it will automatically take you to the dashboard.
Through Your Browser
This is the approach I always use as it’s fast.
Type this into the address bar:
yourdomain.com/wp-admin
The “yourdomain.com” is where you enter your own domain.
Now you can use your username and password that you set up at the beginning.
PRO TIP: Save yourself time: bookmark your login page so you can easily return to it.
If WordPress Isn’t Installed Yet
If your hosting did not automatically install WordPress, your hosting provider should have specific instructions for their setup. Here’s what you can do in most cases:
Option A: Use a One-Click Installer
Hosts may include a WordPress installer like Softaculous, WordPress Manager, or something similar.
Follow the instructions they provide you, or Google the hosting provider and “Setting up WordPress on XYZ” (the hosting provider). There should be instructions online if it’s a reputable hosting provider.
Here are the key next steps:
- Go to your hosting dashboard.
- Find the WordPress installer.
- Choose your domain name.
- Set a site title, username, and password.
- Click Install.
Option 2: Manual Installation (Advanced)
Want to challenge yourself? I recommend following your hosting provider’s instructions on this. Once again, Google or find their steps in their resources.
However, here are the general steps for manual installation:
- Download WordPress from WordPress.org.
- Upload the files via your hosting File Manager or FTP (usually found in the cPanel)
- Create a MySQL database.
- Connect it in your wp-config.php file.
- Run the installation script at your domain URL.
I don’t advise beginners to use this approach, as it will be more frustrating than not. However, it’s useful to know for future site migrations.
4. Customize Your Basic WordPress Settings
I know it’s tempting to start writing your first blog, but before you do so, you’ll need to configure a few essential things.
Getting started with WordPress includes ensuring your blog looks professional and works better in search results.
Watch this video on getting started with WordPress first! It gives you an overview of the WordPress dashboard and where things are:
Set Your Site Title and Tagline
Go to Settings / General
- Site Title: Your blog name.
- Tagline: A short phrase describing what your blog is about.
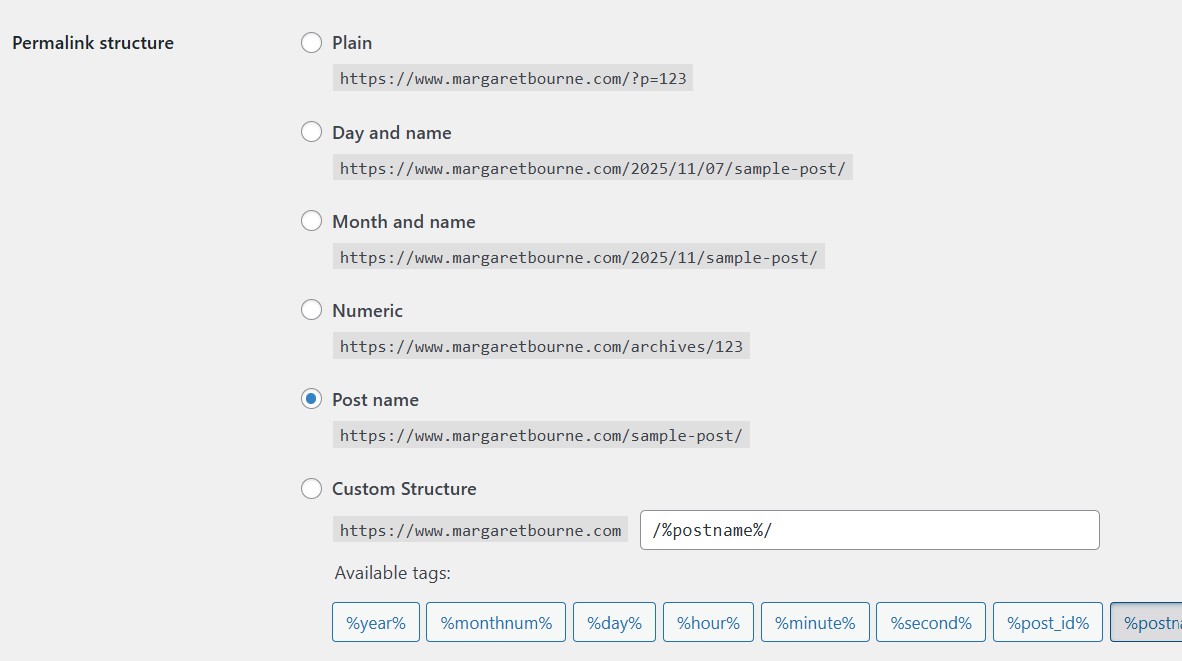
Set Your Permalinks
Go to Settings / Permalinks
Choose “Post name.”
This ensures your blog post URLs look clean and SEO-friendly, like:
yourdomain.com/start-a-blog
instead of
yourdomain.com/?p=123
Here’s an example of how I have mine set up:
Check Your SSL (HTTPS)
Most hosting plans automatically install an SSL certificate (that’s the “lock” icon in your browser).
If you see “Not Secure” next to your domain, go to your hosting dashboard and enable SSL manually. If you’re not sure, ask customer service to help you how to do this.
Once this is done, make sure your site URL in Settings / General starts with https://.
Remove Demo Content
You’ll see demo content when you first log in. You want to delete this for search engines start to index your real content.
Go to Posts / All Posts and Comments to delete them.
5. Select And Install A Custom WordPress Theme
The truth is that the default WordPress theme is pretty simple and not overly attractive.
Themes control the way your blog looks to site visitors. One of the key WordPress tips for beginners is to create a great first impression with a custom theme.
Choose a theme that suits your niche and blog’s branding. Installing it is easy.
There are several options that I recommend:
Kadence
It’s a free basic theme, with a framework that allows you to build pages and unique blocks. You can upgrade to pro for additional features. It’s extremely customizable and has a slight learning curve.
There are premade “templates” with design elements that you can apply as “child themes”. Think of child themes as a beautiful dress you put on, transforming how you look.
17th Avenue Designs
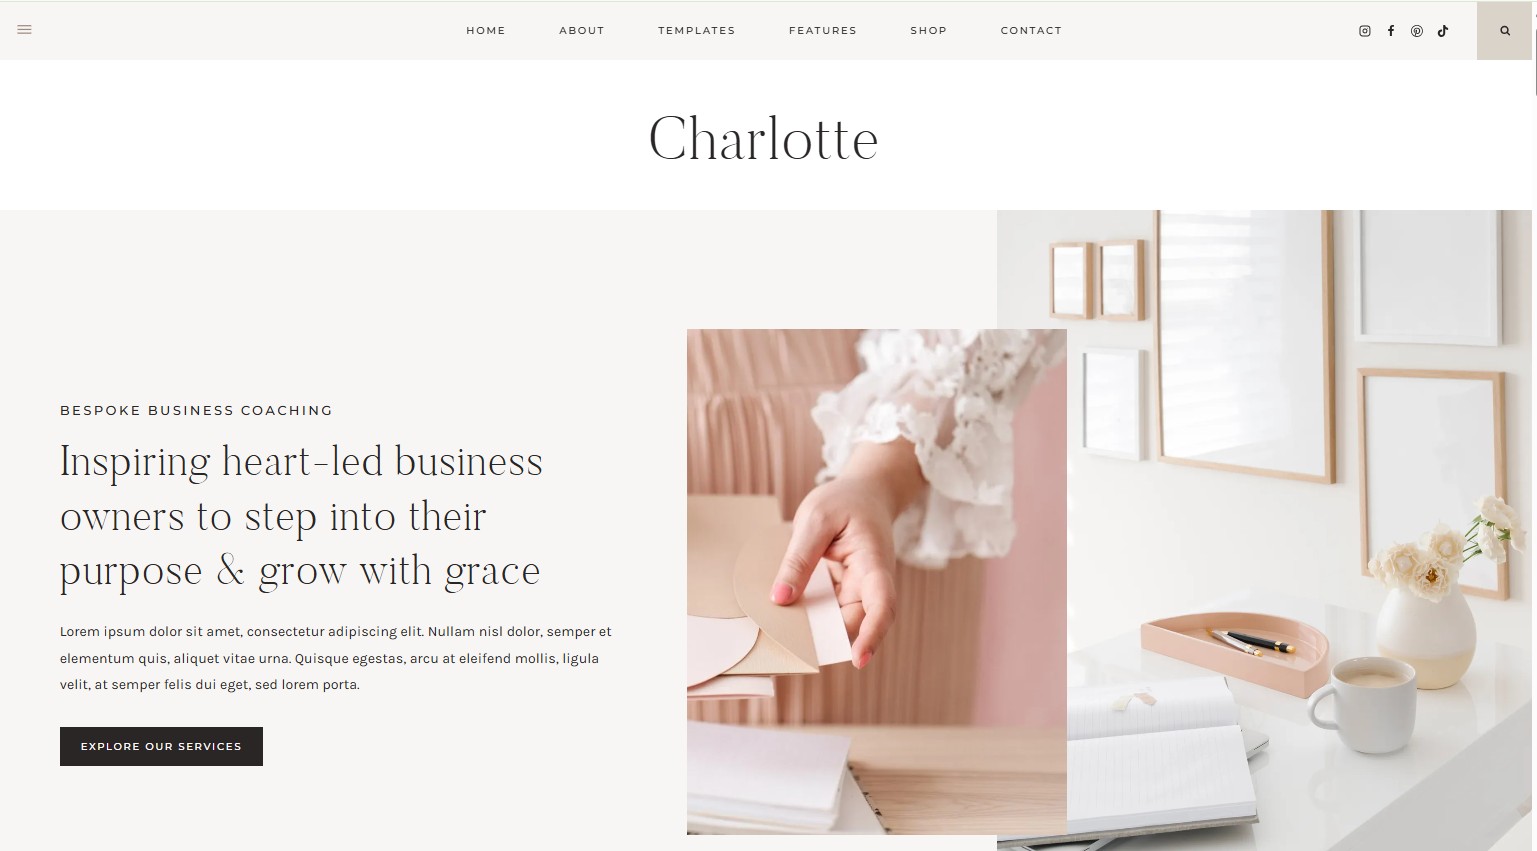
This is a WordPress theme design shop with child themes for the Kadence theme. Customizable, with beautiful blog and website layouts, for bloggers and creative business owners, 17th Avenue website themes are an investment, with excellent customer service and support.
Here’s an example of the Charlotte theme – simply stunning and jam-packed full of options:
Studio Mommy
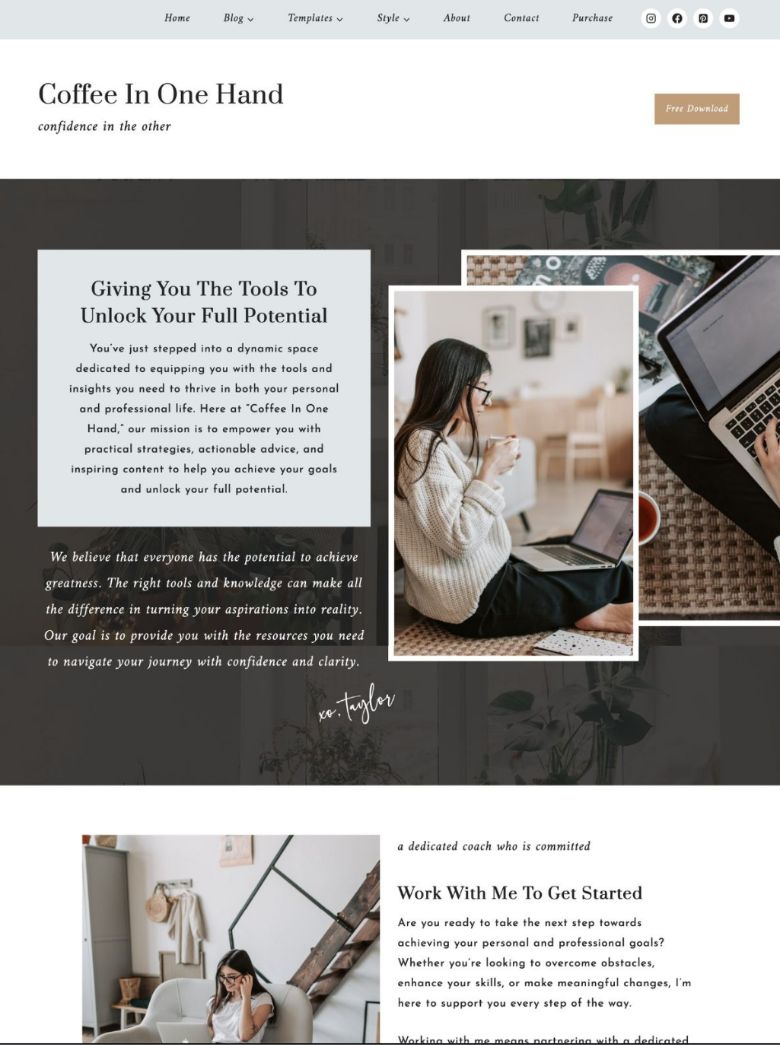
Entry-level, simple blog themes that are perfect for beginners and super affordable. These are child themes for Kadence. Great support from the website designer if you need help.
Here’s one of the great themes from Studio Mommy:
Bluchic
If you’re ambitious and want to start a business-focused blog, Bluchic themes are great. With customizable theme templates for Elementor (free version, page builder), these are beautiful, professional-looking themes for solopreneurs and creative business owners.

Installing Your Custom Theme
Each theme will have its own specifics for installation. However, in most cases, you have to import it in Settings / Appearances / Themes.
When you’ve added it to your list of themes, you will need to activate it.
- Search for your theme in the Add New section.
- Click Install, then Activate.
If you’ve purchased a custom theme, upload the .zip file to Appearance / Themes / Upload Theme.
PRO TIP: Always choose a theme that matches your long-term goals — something clean, easy to read, and flexible for growth.
6. Install Essential Plugins
Plugins add functionality to your site. These are things like contact forms, backups, and SEO tools.
The good news is that there are many free WordPress plugins that can help you enhance your website.
To install a plugin:
- Go to Plugins / Add New.
- Search for the plugin you want.
- Click Install Now, then Activate.
Here are a few must-have free WordPress plugins for beginners:
- RankMath SEO (Free version) – Helps guide you as you optimize posts for search engines. Get the RankMath plugin.
- UpdraftPlus (Free) – Automatically backs up your site to your Google Drive or other preferred location. Get UpdraftPlus.
- WPForms Lite (Free) – Adds easy contact forms.
- Wordfence (Free) – Protects your site from hackers.
At this point, I recommend one investment: WP Rocket. This is a caching plugin that greatly improves the site speed, delivering a better experience for your visitors.
Remember: too many plugins can slow down your site. Less is more when it comes to the backend. Start with the essentials. Also, note that you can remove plugins such as Monster Insights.
If you’re not using a plugin, deactivate it and delete it from your site.
7. Customize Your Site
Now it’s time to make your website look attractive and ‘on-brand’.
Go to Appearance / Customize. Here you can change your colours, fonts, logo, and homepage layout.
You can also go to Appearance / Menus to set up your main navigation and Widgets to manage sidebar content like search bars or recent posts.
NOTE: You will need to create and publish some pages, like your About and Contact pages, to add them to your menu. The same applies to blog categories.
Spend a little time here making your site reflect your personality and brand.
PRO TIP: For help creating your visual branding and brand messaging, check out my Blog Branding Toolkit.
8. Set Up Your Logo and Favicon
One of the easiest WordPress tips for beginners is also a fun one, as it is related to visual branding.
It’s creating and adding the little Favicon (symbol) and your blog’s logo!
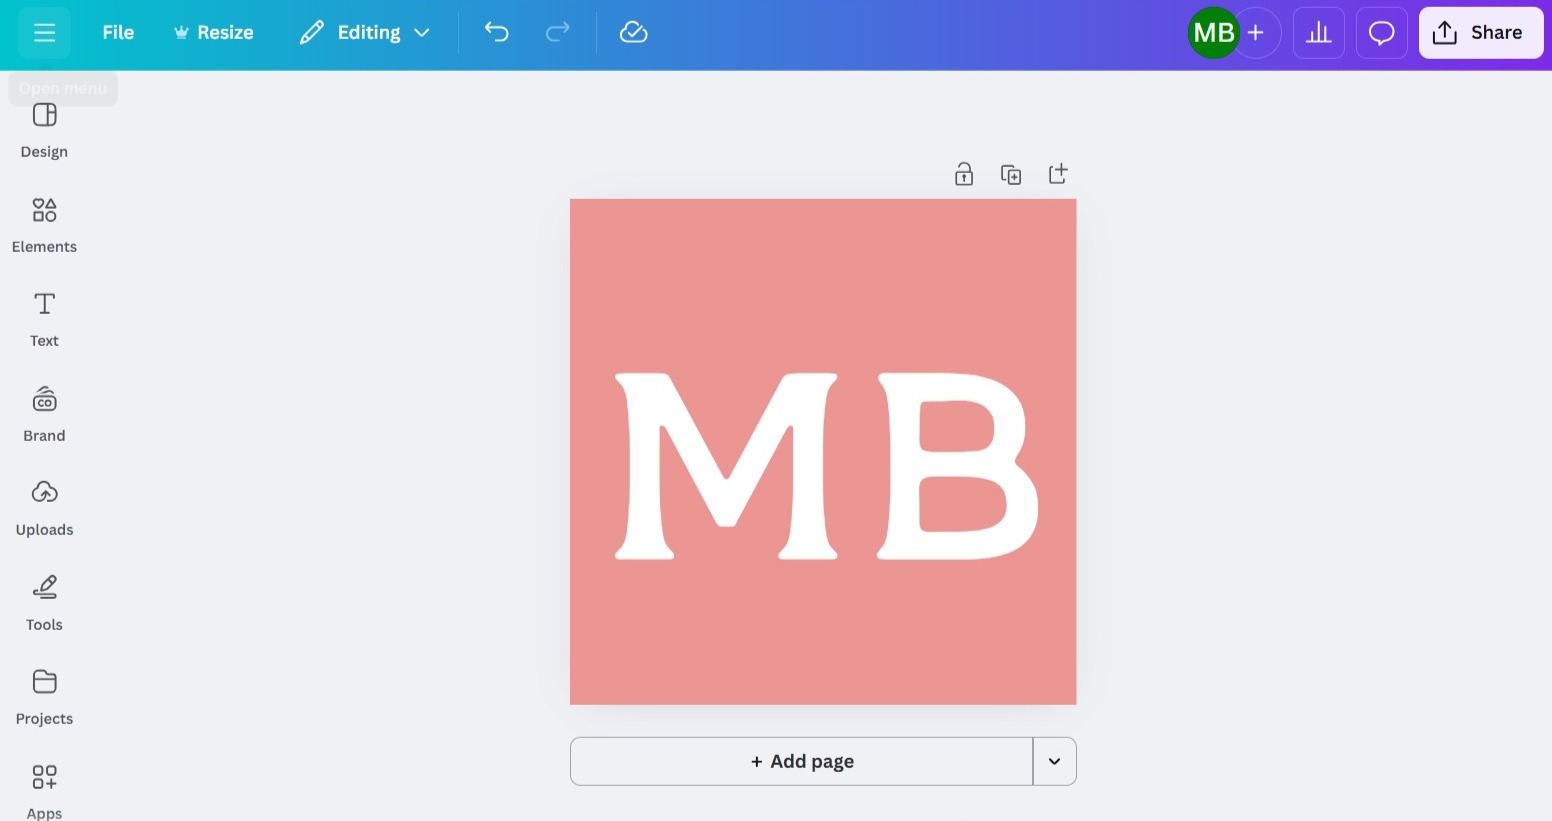
The easiest way to create a Favicon is to use Canva:
- Use a custom 1:1 ratio image (use the theme’s preferred minimum – Kadence is 512 px x 512 px)
- Keep it simple: your dominant colour
- Create a design that’s recognizable
- The design needs to fit in the image size
My Favicon is simple: my site’s initials against one of the dominant colours.
For your website logo, you can go as simple or as intricate as you like. Simple is sometimes better.
With website logos, it’s better to have a landscape version unless your header setup limits your space.
Learn more about designing a blog logo easily and quickly, without spending a bomb.
9. Create Your First Pages
Getting started with WordPress includes protecting your website legally. Before you start blogging, create a few key pages:
- About Page – Tell readers who you are and what your blog is about.
- Contact Page – Add a simple form (via WPForms).
- Legal Pages – Privacy Policy, Disclaimer, Terms & Conditions
If you’re planning on monetizing your blog with ads, affiliate links or selling products and services, you will need to have your legal pages.
You should have them even if you don’t, just to ensure that somebody isn’t as likely to sue you for the information you provide. Read more about how to blog legally, protecting yourself and your site from lawsuits and FTC fines.
You can get the same legal page templates that I did for my site. No, you can’t just copy mine (that is copyright and “borrowing” it would be theft).
You can purchase your own legal page template bundle – a very affordable investment – that you can use for your new website and any future ones you create.
10. Writing Your First Blog Post
Now’s the time to start writing your very first blog post. I strongly suggest you bypass the topic of why you started your blog (that’s reserved for your About page, where readers expect to see it).
Instead, write your first blog post on one of your core blog topics. For example, one of my first blogging posts was on the topic of how to write a blog post!
To get started: go to Posts / Add New and write your first blog post!
Add a featured image, format your headings, and hit Publish.
Need ideas to jumpstart your blogging? Check out my 200+ lifestyle blog post topics that are perfect for beginners.
Recommendation: I recommend you take some time to experiment with the blocks in WordPress. Also note that if you use Kadence, there are more advanced Kadence blocks. Use both as needed, but sparingly. Too many embellishment blocks can slow down a page load speed.
PRO TIP: Once you have the hang of writing blog posts and adding them to WordPress, switch gears and focus on learning SEO.
READ MORE: Discover How Many Blog Posts You Need To Launch Your Blog
Common Beginner Questions About WordPress Setup
How long does it take for DNS to update?
It will usually take between 15 minutes and 24 hours. In some cases, it can take up to 48 hours. Be patient! Work on planning your categories, and drafting a copy of About page, and even your first blog post if you have to wait longer.
Why isn’t my site showing up yet?
Your domain might still be propagating, or your WordPress installation hasn’t finished processing. Give it some time and clear your browser cache (go to Chrome, Firefox or whatever browser you’re using and clear the cache).
What’s the difference between WordPress.com and WordPress.org?
WordPress.org is the self-hosted version. You own your site and can install any theme or plugin. WordPress.com is limited and better suited for hobby blogs.
Why isn’t my website showing up in Google searches?
If you haven’t submitted your website’s sitemap to Google in Google Search Console, it hasn’t crawled your website yet. Plugins such as RankMath and Yoast can help with this. You will also need to optimize your content to ensure it’s getting indexed by search engines.
Start Setting Up WordPress: Get Help When Needed
Setting up WordPress for beginners can feel daunting, but once you’ve gone through the steps, you’ll see how intuitive it really is.
By now, you know how to set up WordPress, including:
- Setting up hosting and connecting your domain
- Logging into your WordPress dashboard
- Configuring essential settings
- Installing a theme and plugins
- Creating your first pages
You can now make your blog officially live and turn off any “coming soon” landing pages if your WordPress has that option.
Now the fun part begins!
If at any point you find yourself stuck, we can always connect for a blog coaching session.
Learning how to set up WordPress and becoming familiar with it makes a world of difference. I wish I had somebody there to answer all the questions I had about it when I was starting my blog on it.
For this reason, I work with new bloggers as a blog coach. While I’m not a technical expert, I can give you the essential insights into how to set things up and finally get started.
QUESTION: In this WordPress blog tutorial for beginners, what did you find the most helpful?
Have you found this guide for setting up WordPress for beginners useful? Share it with others by pinning it to Pinterest – thanks!
